✨ 목표
지난 글에서는 Electron을 이용해 간단한 랜덤 룰렛 프로그램을 만들어봤습니다.
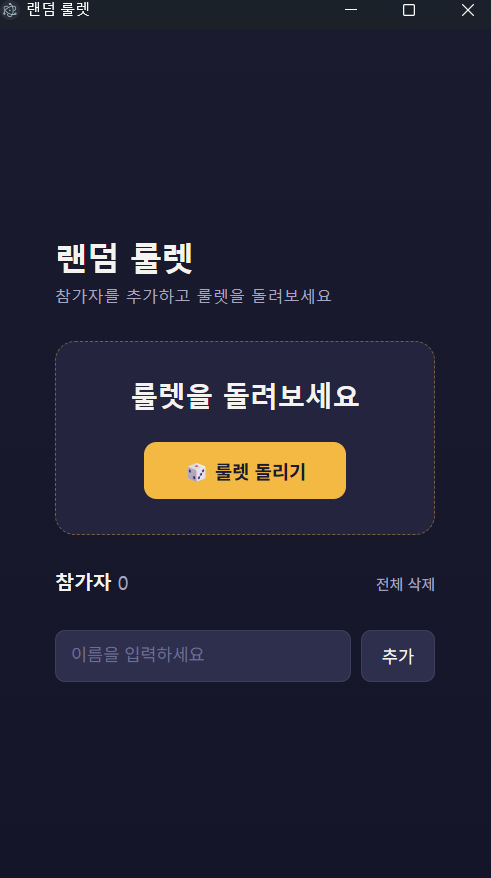
이번 글에서는 기존에 만든 랜덤 룰렛의 화면을 조금 더 다듬어 실제로 사용할 수 있는 데스크톱 앱 형태로 개선해보겠습니다.
이번 작업에서는 앱 창 크기부터 화면 구성, 색상, 참가자 관리 기능까지 함께 수정했습니다.
🎨 앱 디자인 변경 후 완성된 화면
✔️ 1. Electron 창 설정 변경하기
먼저 main.js에서 Electron 창의 기본 설정을 변경합니다.
기존에는 테스트를 위해 단순히 창의 크기만 지정했지만, 이번에는 실제 프로그램처럼 사용할 수 있도록 창의 크기와 배경색 등을 설정했습니다.
const { app, BrowserWindow, Menu } = require('electron');

const createWindow = () => {
  const win = new BrowserWindow({
    width: 420,
    height: 720,
    resizable: true,
    backgroundColor: '#1B1B2F'
  });

  win.loadFile('index.html');
};

app.whenReady().then(() => {
  Menu.setApplicationMenu(null); // 기본 메뉴바 제거 (File, Edit 등)
  createWindow();

  app.on('activate', () => {
    if (BrowserWindow.getAllWindows().length === 0) {
      createWindow();
    }
  });
});

app.on('window-all-closed', () => {
  if (process.platform !== 'darwin') {
    app.quit();
  }
});
🔹 창 크기 변경
width: 420,
height: 720,
resizable: true,
기존의 800 × 600 크기에서 420 × 720 크기로 변경했습니다.
랜덤 룰렛 프로그램의 화면 구성에 맞춰 세로로 긴 형태의 창을 사용하도록 했습니다.
또한 resizable: true를 설정해 사용자가 창 크기를 변경할 수 있도록 했습니다.
🔹 배경색 설정
backgroundColor: '#1B1B2F'
🔹 기본 메뉴바 제거
Menu.setApplicationMenu(null);
Electron에서 기본적으로 제공되는 File, Edit 등의 메뉴바를 제거합니다.
이번 프로그램에서는 별도의 메뉴바가 필요하지 않기 때문에 제거했습니다.
💡 참고
Menu를 사용하기 위해 require('electron')에서 Menu도 함께 가져와야 합니다.
✔️ 2. HTML 구조 변경하기
다음으로 index.html을 수정해 프로그램의 전체적인 화면 구조를 정리했습니다.
<!DOCTYPE html>
<html lang="ko">
<head>
  <meta charset="UTF-8">
  <title>랜덤 룰렛</title>
  <link rel="stylesheet" href="style.css">
</head>
<body>

  <div class="app">
    <header class="app-header">
      <h1>랜덤 룰렛</h1>
      <p class="subtitle">참가자를 추가하고 룰렛을 돌려보세요</p>
    </header>

    <section class="stage">
      <div id="result" class="result">룰렛을 돌려보세요</div>
      <button id="spinButton" class="spin-button">🎲 룰렛 돌리기</button>
    </section>

    <section class="participants">
      <div class="participants-head">
        <h2>참가자 <span id="participantCount">0</span></h2>
        <button id="clearButton" class="text-button" type="button">전체 삭제</button>
      </div>

      <ul id="participantList" class="participant-list"></ul>

      <form id="addForm" class="add-form">
        <input
          type="text"
          id="participantInput"
          placeholder="이름을 입력하세요"
          autocomplete="off"
        />
        <button type="submit" class="add-button">추가</button>
      </form>
    </section>
  </div>

  <script src="script.js"></script>
</body>
</html>
기존의 단순한 HTML에서 프로그램을 크게 헤더 / 룰렛 영역 / 참가자 영역으로 나누었습니다.
🔹 lang="ko"
<html lang="ko">
문서의 기본 언어가 한국어임을 나타냅니다.
🔹 참가자 영역
이번에는 참가자 이름을 직접 입력하고 목록으로 관리할 수 있도록 구성했습니다.
<h2>참가자 <span id="participantCount">0</span></h2>
참가자 수를 표시하고,
<button id="clearButton" ...>전체 삭제</button>
버튼을 통해 참가자를 한 번에 삭제할 수 있도록 했습니다.
✔️ 3. CSS를 이용해 UI 개선하기
이번에는 style.css를 새로 작성해 전체적인 디자인을 변경했습니다.
:root {
  --bg: #1b1b2f;
  --bg-deep: #15152a;
  --surface: #24243e;
  --surface-alt: #2e2e4d;
  --border: rgba(255, 255, 255, 0.08);
  --text: #f5f3f0;
  --text-muted: #a6a6c1;
  --accent: #f4b942;
  --accent-dim: rgba(244, 185, 66, 0.4);
  --coral: #ff6f59;
}

* {
  box-sizing: border-box;
}

body {
  margin: 0;
  min-height: 100vh;
  display: flex;
  align-items: center;
  justify-content: center;
  background: linear-gradient(180deg, var(--bg) 0%, var(--bg-deep) 100%);
  font-family: 'Apple SD Gothic Neo', 'Malgun Gothic', -apple-system, BlinkMacSystemFont, sans-serif;
  color: var(--text);
}

.app {
  width: 360px;
  padding: 32px 28px 28px;
}

.app-header h1 {
  margin: 0 0 4px;
  font-size: 26px;
  font-weight: 700;
  letter-spacing: -0.02em;
}

.subtitle {
  margin: 0 0 28px;
  font-size: 13px;
  color: var(--text-muted);
}

.stage {
  background: var(--surface);
  border: 1px dashed var(--accent-dim);
  border-radius: 16px;
  padding: 28px 20px;
  text-align: center;
  margin-bottom: 28px;
}

.result {
  font-size: 22px;
  font-weight: 700;
  min-height: 32px;
  margin-bottom: 20px;
  word-break: keep-all;
  transition: transform 0.2s ease, color 0.2s ease;
}

.result.winner {
  color: var(--accent);
  transform: scale(1.08);
}

.spin-button {
  background: var(--accent);
  color: var(--bg);
  border: none;
  border-radius: 10px;
  padding: 12px 32px;
  font-size: 15px;
  font-weight: 700;
  cursor: pointer;
  transition: opacity 0.15s ease, transform 0.1s ease;
}

.spin-button:hover:not(:disabled) {
  opacity: 0.9;
}

.spin-button:active:not(:disabled) {
  transform: scale(0.97);
}

.spin-button:disabled {
  opacity: 0.5;
  cursor: default;
}

.participants-head {
  display: flex;
  align-items: baseline;
  justify-content: space-between;
  margin-bottom: 12px;
}

.participants-head h2 {
  font-size: 15px;
  font-weight: 700;
  margin: 0;
}

#participantCount {
  color: var(--text-muted);
  font-weight: 400;
}

.text-button {
  background: none;
  border: none;
  color: var(--text-muted);
  font-size: 12px;
  cursor: pointer;
  padding: 0;
}

.text-button:hover {
  color: var(--coral);
}

.participant-list {
  list-style: none;
  margin: 0 0 16px;
  padding: 0;
  max-height: 180px;
  overflow-y: auto;
}

.participant {
  display: flex;
  align-items: center;
  justify-content: space-between;
  padding: 10px 4px;
  border-bottom: 1px solid var(--border);
  font-size: 14px;
}

.participant:last-child {
  border-bottom: none;
}

.remove-button {
  background: none;
  border: none;
  color: var(--text-muted);
  font-size: 18px;
  line-height: 1;
  cursor: pointer;
  padding: 0 4px;
}

.remove-button:hover {
  color: var(--coral);
}

.add-form {
  display: flex;
  gap: 8px;
}

#participantInput {
  flex: 1;
  background: var(--surface-alt);
  border: 1px solid var(--border);
  border-radius: 8px;
  padding: 10px 12px;
  color: var(--text);
  font-size: 14px;
}

#participantInput::placeholder {
  color: #6e6e92;
}

#participantInput:focus {
  outline: 2px solid var(--accent);
  outline-offset: 1px;
}

.add-button {
  background: var(--surface-alt);
  color: var(--text);
  border: 1px solid var(--border);
  border-radius: 8px;
  padding: 10px 16px;
  font-size: 14px;
  cursor: pointer;
}

.add-button:hover {
  background: #383860;
}
프로그램 전체에 사용할 색상은 CSS 변수를 이용해 관리했습니다.
:root {
  --bg: #1b1b2f;
  --bg-deep: #15152a;
  --surface: #24243e;
  --surface-alt: #2e2e4d;
  --border: rgba(255, 255, 255, 0.08);
  --text: #f5f3f0;
  --text-muted: #a6a6c1;
  --accent: #f4b942;
  --accent-dim: rgba(244, 185, 66, 0.4);
  --coral: #ff6f59;
}
이렇게 색상을 변수로 지정하면 여러 CSS 속성에서 같은 색상을 사용할 때 관리하기 편합니다.
예를 들어 주요 배경색은 다음과 같이 사용할 수 있습니다.
body {
  background: linear-gradient(
    180deg,
    var(--bg) 0%,
    var(--bg-deep) 100%
  );
}
이번에는 전체적으로 어두운 배경에 노란색 계열의 포인트 색상을 사용해 프로그램의 분위기를 통일했습니다.
✔️ 4. 참가자 관리 기능 추가하기
기존에는 참가자를 단순히 배열에 추가하기만 했지만, 이번에는 참가자를 삭제하거나 중복으로 추가하지 못하도록 수정했습니다.
const participants = [];
let spinning = false;

const resultEl = document.getElementById('result');
const spinButton = document.getElementById('spinButton');
const participantList = document.getElementById('participantList');
const participantCount = document.getElementById('participantCount');
const addForm = document.getElementById('addForm');
const participantInput = document.getElementById('participantInput');
const clearButton = document.getElementById('clearButton');

addForm.addEventListener('submit', (e) => {
  e.preventDefault();
  addParticipant();
});

clearButton.addEventListener('click', () => {
  if (participants.length === 0) return;
  participants.length = 0;
  resultEl.textContent = '룰렛을 돌려보세요';
  resultEl.classList.remove('winner');
  render();
});

spinButton.addEventListener('click', () => {
  if (spinning) return;

  if (participants.length === 0) {
    resultEl.textContent = '참가자를 먼저 추가해주세요';
    resultEl.classList.remove('winner');
    return;
  }

  spin();
});

function addParticipant() {
  const name = participantInput.value.trim();

  if (!name) return;

  if (participants.includes(name)) {
    participantInput.value = '';
    participantInput.placeholder = '이미 추가된 이름이에요';
    return;
  }

  participants.push(name);
  participantInput.value = '';
  render();
}

function removeParticipant(index) {
  participants.splice(index, 1);
  render();
}

function render() {
  participantCount.textContent = participants.length;
  participantList.innerHTML = '';

  participants.forEach((name, index) => {
    const li = document.createElement('li');
    li.className = 'participant';

    const nameSpan = document.createElement('span');
    nameSpan.textContent = name;

    const removeBtn = document.createElement('button');
    removeBtn.type = 'button';
    removeBtn.className = 'remove-button';
    removeBtn.textContent = '×';
    removeBtn.setAttribute('aria-label', `${name} 삭제`);
    removeBtn.addEventListener('click', () => removeParticipant(index));

    li.appendChild(nameSpan);
    li.appendChild(removeBtn);
    participantList.appendChild(li);
  });
}

// setInterval은 간격을 고정으로 주기 때문에, setTimeout을 재귀 호출해서
// 점점 느려지는 룰렛 느낌을 냅니다.
function spin() {
  spinning = true;
  spinButton.disabled = true;
  resultEl.classList.remove('winner');

  const winner = participants[Math.floor(Math.random() * participants.length)];
  const totalTicks = 16;
  let tick = 0;

  function tickOnce() {
    const randomName = participants[Math.floor(Math.random() * participants.length)];
    resultEl.textContent = randomName;
    tick += 1;

    if (tick < totalTicks) {
      const delay = 60 + tick * 12; // 점점 느려짐
      setTimeout(tickOnce, delay);
    } else {
      resultEl.textContent = `🎉 ${winner}`;
      resultEl.classList.add('winner');
      spinButton.disabled = false;
      spinning = false;
    }
  }

  tickOnce();
}
🔹 중복 참가자 방지
if (participants.includes(name)) {
participantInput.value = '';
participantInput.placeholder = '이미 추가된 이름이에요';
return;
}
includes()를 이용해 같은 이름이 이미 참가자 목록에 있는지 확인합니다.
이미 존재하는 이름이라면 배열에 추가하지 않고 안내 문구를 표시합니다.
🔹 참가자 삭제
각 참가자 옆에 × 버튼을 추가하고, 버튼을 클릭하면 해당 참가자를 삭제하도록 했습니다.
function removeParticipant(index) {
participants.splice(index, 1);
render();
}
splice()를 이용해 배열에서 해당 위치의 참가자를 삭제합니다.
✔️ 5. 참가자 목록 화면에 표시하기
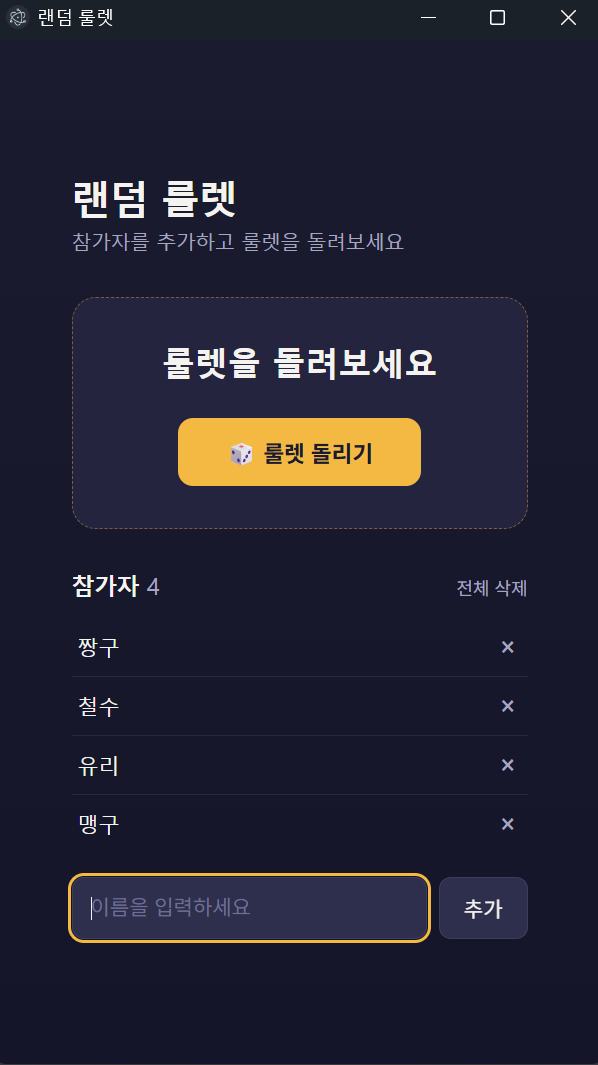
참가자가 추가되거나 삭제될 때마다 화면의 참가자 목록을 다시 그리도록 render() 함수를 만들었습니다.
function render() {
  participantCount.textContent = participants.length;
  participantList.innerHTML = '';

  participants.forEach((name, index) => {
    const li = document.createElement('li');
    li.className = 'participant';

    const nameSpan = document.createElement('span');
    nameSpan.textContent = name;

    const removeBtn = document.createElement('button');
    removeBtn.type = 'button';
    removeBtn.className = 'remove-button';
    removeBtn.textContent = '×';

    removeBtn.addEventListener('click', () => {
      removeParticipant(index);
    });

    li.appendChild(nameSpan);
    li.appendChild(removeBtn);
    participantList.appendChild(li);
  });
}
이제 참가자를 추가하면 목록에 표시되고, 각 참가자 옆의 × 버튼을 클릭하면 해당 참가자를 삭제할 수 있습니다.
또한 참가자 수 역시 자동으로 업데이트됩니다.
✔️ 6. 룰렛 동작 개선하기
기존에는 버튼을 클릭하면 바로 당첨자가 표시되는 방식이었습니다.
이번에는 실제 룰렛을 돌리는 것처럼 여러 참가자의 이름이 빠르게 바뀌다가 점점 느려지면서 당첨자를 보여주는 방식으로 변경했습니다.
function spin() {
  spinning = true;
  spinButton.disabled = true;

  resultEl.classList.remove('winner');

  const winner =
    participants[Math.floor(Math.random() * participants.length)];

  const totalTicks = 16;
  let tick = 0;

  function tickOnce() {
    const randomName =
      participants[Math.floor(Math.random() * participants.length)];

    resultEl.textContent = randomName;

    tick += 1;

    if (tick < totalTicks) {
      const delay = 60 + tick * 12;
      setTimeout(tickOnce, delay);
    } else {
      resultEl.textContent = `🎉 ${winner}`;
      resultEl.classList.add('winner');

      spinButton.disabled = false;
      spinning = false;
    }
  }

  tickOnce();
}
여기서 중요한 부분은 setTimeout()입니다.
const delay = 60 + tick * 12;
setTimeout(tickOnce, delay);
💡 참고
setInterval() 대신 setTimeout()을 재귀적으로 호출해 다음 실행 시간을 매번 다르게 지정했습니다.
✔️ 7. 룰렛 실행 중 중복 클릭 방지
룰렛이 실행되는 동안 버튼을 여러 번 클릭하면 여러 개의 룰렛이 동시에 실행될 수 있습니다.
이를 방지하기 위해 spinning 변수를 사용했습니다.
let spinning = false;
룰렛을 실행할 때:
if (spinning) return;
spinning = true;
spinButton.disabled = true;
룰렛이 끝나면 다시:
spinButton.disabled = false;
spinning = false;
로 변경합니다.
이렇게 하면 룰렛이 실행되는 동안에는 추가로 룰렛을 실행할 수 없습니다.
✔️ 8. 실행해보기
이제 VS Code 터미널에서 프로그램을 실행합니다.
npm start
Electron 앱이 실행되면 참가자를 추가하고 🎲 룰렛 돌리기 버튼을 눌러 결과를 확인할 수 있습니다.
이번에는 단순히 Electron 창을 띄우는 수준에서 벗어나 참가자 추가 → 참가자 관리 → 룰렛 실행 → 결과 확인까지 하나의 작은 앱으로 동작하게 되었습니다.
'개발공부기록 > Electron 데스크톱 앱 개발' 카테고리의 다른 글
| [Electron 데스크톱 앱 개발] #6: Electron 앱 설치 오류 원인 확인하기 (0) | 2026.09.16 |
|---|---|
| [Electron 데스크톱 앱 개발] #5: Electron 앱 패키징하기 (Windows 실행 파일 만들기) (0) | 2026.09.16 |
| [Electron 데스크톱 앱 개발] #3: 첫 번째 Electron 앱 만들기 (랜덤 룰렛) (0) | 2026.09.15 |
| [Electron 데스크톱 앱 개발] #2: Electron 개발환경 준비하기 (Node.js + Electron 설치) (0) | 2026.09.14 |
| [Electron 데스크톱 앱 개발] #1: Electron 입문, 데스크톱 앱 개발을 시작해보자 (0) | 2026.09.11 |